
Body
November 14, 2012
VCBC Technical Session – Bodywork – held at KMS Tools, Coquitlam Nov.14, 2012. A special thanks to Chris Ainscough for arranging this.
Geody Rose, an accomplished tinsmith and panel beater gave us a whirlwind tour through auto bodywork repair at KMS Tools in Coquitlam, BC. In a very short time we realized that Geody is a contender for the Eveready Energizer Bunny, energetically explaining everything from tools of the trade to paint tips and choices.

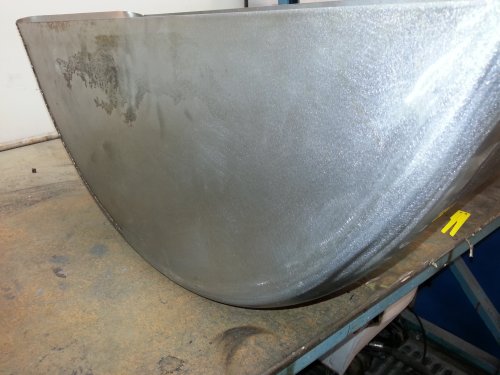
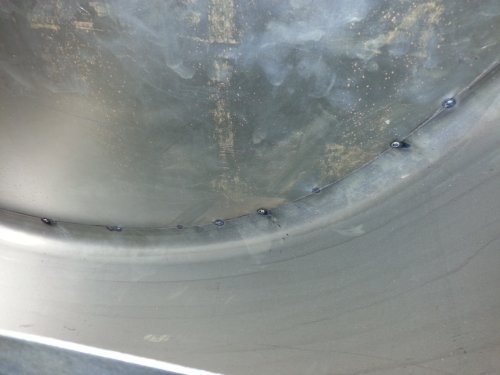
The first lesson for our seventeen club members was to study a pair of wheel tubs made from three panels, partially completed showing three progressive stages of butt weld joining: spot welds spaced evenly about 2 inches apart; a mig weld seam partly sanded down and a completely dressed or sanded area with no visible seam. The key lesson here is don’t overheat the metal at all stages, from cutting the panels with a zip saw with a thin blade small diameter disc, religiously mig welding intermittently, and grind down and dress the weld with small grinding stones or discs. Geody has seen the last grinding and sanding step ruin hours of excellent cutting, shaping, fitting and welding work by heat distortion. Using large diameter grinding and sanding discs can apply too much heat to the joint and surrounding panels.
Butt versus lap joints:
Lap joints are a great starting point for the first time mig welder. However their use should be limited due to the risk of moisture being trapped or eventually work into this joint. Butt joints must be gapped to provide a space for the weld filler material. A useful gauge is a fine tooth jig saw blade. If panel edges are touching with no gap, after grinding down the weld, the joint is barely holding together.
Panel thickness:
Geody uses mostly 18 gage sheet, and 16 gage for floors. He warned about some cheap reproduction panels from Taiwan that are extremely thin or vary considerably in thickness throughout the panel. OEM panels are preferred.
Mig versus Tig:
Mig welding is easy to learn, fast and easy to control, but it makes a hard weld not suitable for panel areas that flex. The majority of welding is by mig because of speed.
Tig welding is more difficult to learn, has more variables to control, relatively slow, but gives a soft weld and is suited for special locations where panels need flexibility, such as the external fenders of the 1927 Model A Ford which he was rebuilding. These fenders have chronic cracking which can be re-welded by Tig.
Brazing is not recommended, due to its limited strength leading to joint failure and also presents a chore to fix later with the brazing material bleeding into the panel pores, causing spattering when welding failed joints.
Favorite Tools:
•Bead roller – versatile tool used to form different panel edges, stiffening ribs, and lap joints. Used everyday.

•Stretcher/Shrinking tool – different dies can shrink or stretch the metal, with samples of L shaped panel with one the small flange shrunk or expanded. Also used everyday.

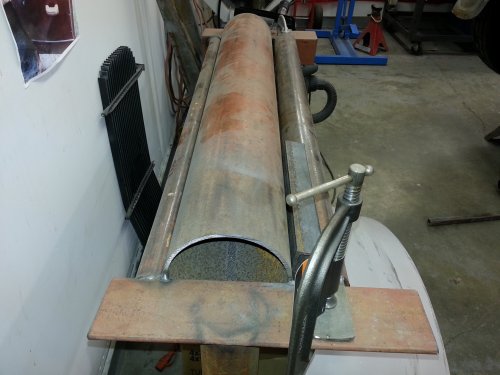
•Roller tool – one of the next handiest tools - used for rolling panels – homemade by Geody. It consists of two stationary pipes and one movable pipe. Length allows wide panels to be bent evenly. Using a piece of angle iron allows sharper bends to be made.
•Flange/punch tool – air driven with jogging and punching dies
•Smaller tools – dollies, rail section, hammers, and leather shot bag
•Special dies – tools, dies or jigs made to build special shapes such new window channels
•Mig Welder – The Miller 180 has been a stellar workhorse of the welding equipment for many years, despite much larger equipment in the KMS shop. Geody recommends a 220 volt unit which can also weld up to 3/16 to ¼ thick plate. Cheaper equipment may have inferior components such as drive rollers and perform poorly or inconsistently.
KMS Project cars:
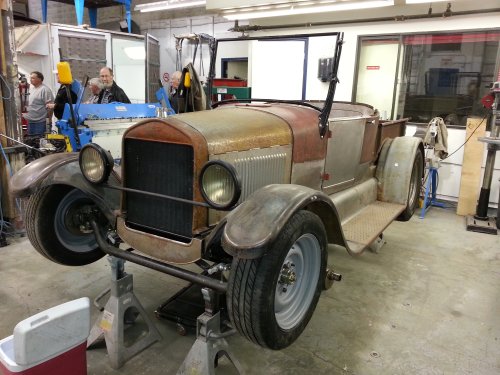
•1927 Model A Ford pickup:
The lower 12 inches of this jaunty road warrior had returned to the earth requiring some replacement and a number of new panels and door-skins to be made and fitted. Floor and transmission panels were also fabricated from scratch. A new custom tube frame is also supporting Geody’s beautiful metalwork above.

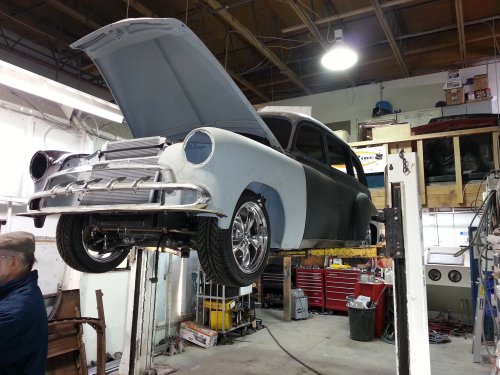
•1952 Chevrolet Tinny:
This rare wagon is striking even with bare metalwork. A custom made firewall and repair panels have been fitted around lower edges and upper rear corners. Although the body exterior is stock the frame is custom made for a modern power train.

Painting Tips:
Geody’s primary work is metal but he passed on these tips on painting:
1.Epoxy sealer – this is the first product to go on bare metal. It offers the best protection from rust. If you can only remember one thing about painting this is it!
2.High build primer – after epoxy sealer
3.Base and clear coat paint or single stage paint – after primers, note that the clear coat contains hardeners which also bleeds into and hardens the base coat.
4.UV protection – only provided by clear coat or single stage paint. This means that primers and base coat have no UV protection without the clear coat.
5.Choice of paint system – Base/Clear or single stage paint? Single stage paint is more prone to fade and difficult to match later.
6.Preparing the car for repainting or re-spraying: if the car is old it may have several paint systems in different areas already, if so removing all the paint to bare metal is the preferred method to guarantee the new paint system will work consistently over the entire car.
7.Clear coat breakdown – if small areas, local area repairs may be possible, but if widespread, then removal and repainting entire car will be required.
8.Paint – don’t buy the cheapest paint, it will come back to haunt you.
9.Water vs solvent base coat – water based paints are still relatively new – only used for a few years in repair shops in Lower Mainland. There have been teething problems and they require different spraying equipment and procedures.
KMS Services:
Paint booth rental is $275 for 24 hrs and a painter Bodo at $70/ hr is available to help you paint your car or can paint it for you.
Special thanks to Geody and KMS Tools for an extremely informative technical session. Geody mentioned a number of times that doing your own metalwork is possible, just take your time. Thank goodness there wasn’t a test at the end of the night; Geody covered an enormous amount of material.